Categorieën
LibrePlan

Latest news about our LibrePlan development work

Hi all,

It has been some time and Miciele has been very busy developing new stuff to add to LibrePlan. In this post I will try to tell you all about our latest modifications.

Configuration database

The first one is under the hood, so not visible to users. We saw that the LibrePlan configuration was stored in 1 record in the “configuration” table and was extended by everyone who wanted to add configuration information to LibrePlan. We developed a new table called AppProperties with the fields “id”, “major”, “minor”, “parameter” and “value”. The idea behind this is that everyone who wants to add configuration information can add his or her’s own records easily. The “major” field is meant for indication some large piece of functionality, like “jira” for a Jira connector. The “minor” field is used for some submodule within this piece of code and the “parameter” and “value” field I guess explain themselves.

We hope the LibrePlan community will accept this configuration model as a new way of storing configuration information.

Multiple connectors

After developing a Jira and a Timn (more on this later) connector and realizing that more connectors are on the way elsewhere in the world we discovered that it could be a good idea if we made connector configuration a different part of the configuration process. To make it more scale-able than it was. So we made a “connectors” tab in the configuration screen with a pull-down list for available connectors.

connectors-configuration

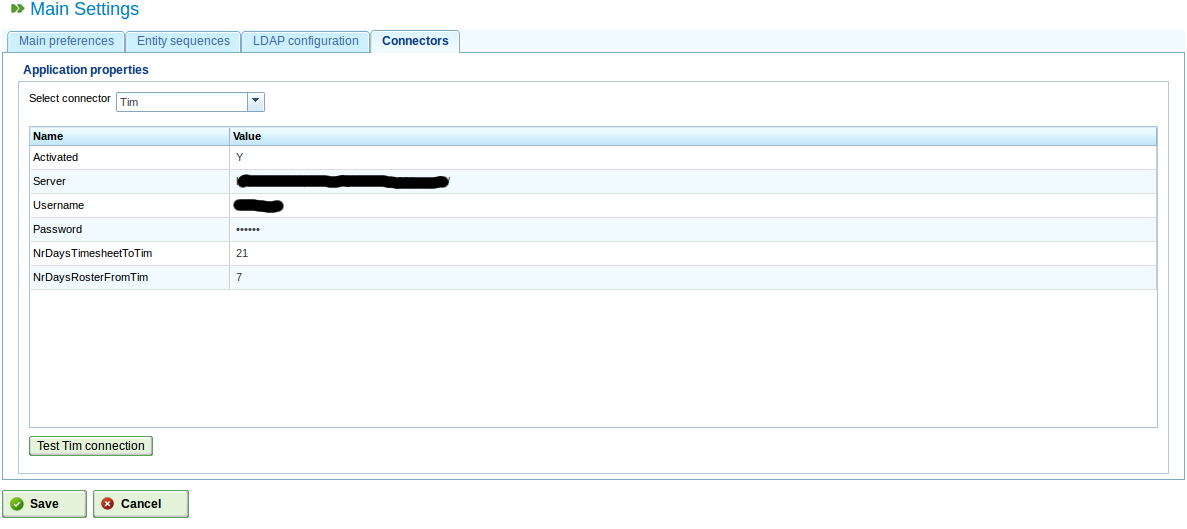
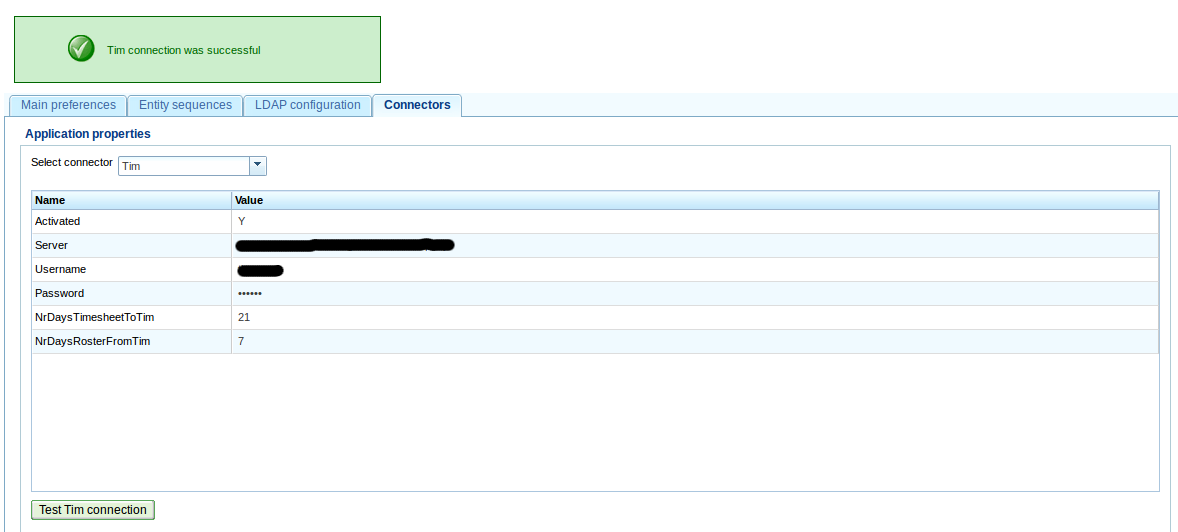
The parameters you can change come from the configuration database and all have a “test-connection” button to help in the process. A screenshot shows this:

test-connection-to-tim

Scheduler

We discovered that some connectors need to run automatically so we added a Java schedulerlibrary to LibrePlan. The configuration syntax is based on the well known crontab configuration syntax so you can enter it manually.

job-scheduling-screen

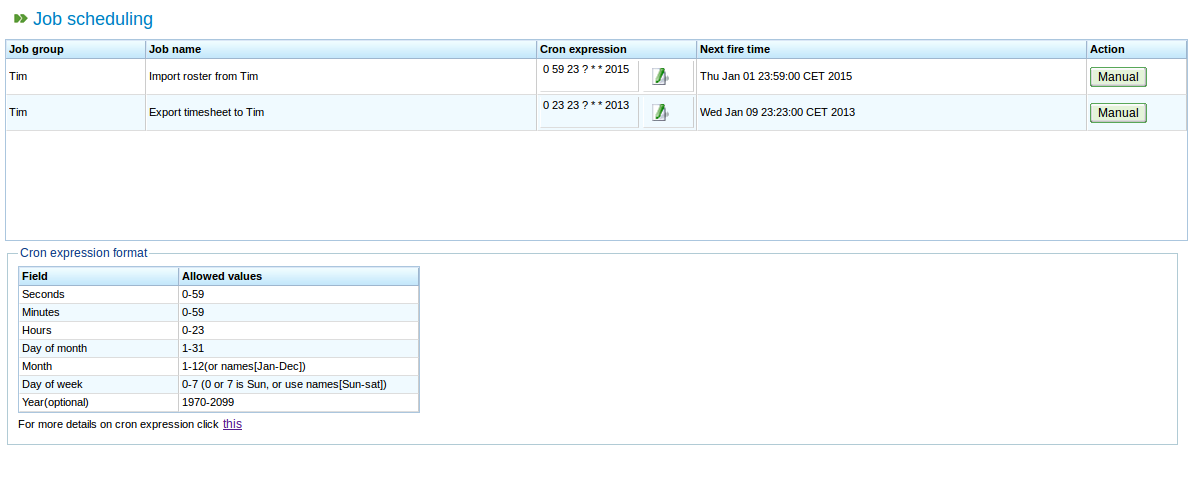
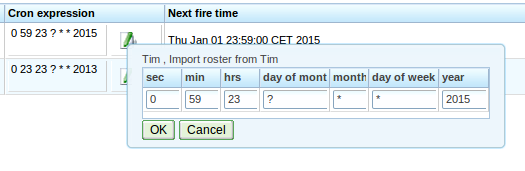
There is a section with some hints about the crontab syntax, the schedules next time to start the job and a manual button to trigger an extra run if you like to test data-exchange if you like.

There is also a little extra window to give you also some basic data-entry functionality.

cron-expression-input-screen

Timn Enterprise connector

This brings me to a new connector we developer specifically to interface with the Dutch Timn Enterprise product from Aenova. Timn is an application for the administration fo time spent on projects and tasks. It is a Dutch product and it is used a lot in large Dutch healthcare organisations and local municipalities (personally I am not very enthusiastic about the product but that is a whole other story). Anyway, we needed a way to sent all the billable hours stored/gathered in LibrePlan to Timn. Timn has some sort of soapish interface so we used that one to get out of Timn the roster of an employee (holidays, sick-leave, etc) and map that to the calender of a user, and we sent the timesheet info back to Timn.

This means that there is an extra connector that can be enabled and if that is done, an extra section is shown in all projectdata screens:

It shows you the last time a sync was made and with what product-code and you can edit and change to a new productcode if you like.

export-to-tim

In the XML format to the Timn interface we define a replacement key based on date, time, user and product so a replace action is done if the record
already exists.

Future plans

We will submit the patches shortly to the core LibrePlan team and look forward to their feedback so we can hopefully have it in 1.4 as soon as possible.

Miciele will than start with a new piece of functionality to LibrePlan because sometimes we want to plan a project more SCRUM-like with a backlog combined with resource allocation. As soon as there is something to show we will write about it again.

Bye for now,

Jeroen.

Categorieën
Geen categorie

Beschermd: Een nieuw EPD idee

Deze inhoud is beschermd met een wachtwoord. Voer hieronder je wachtwoord in om het te bekijken.

Categorieën
Geen categorie

Aenova’s Timn Enterprise en SOAP

Inleiding

Recentelijk heb ik ervaring opgedaan met de SOAP interface van het Timn Enterprise product van Aenova. Omdat er nogal wat mensen in Nederland gebruik maken van dit product leek het me wel leuk om de opgedane kennis te delen.

Er zijn daarbij vooraf een aantal zaken die je moet weten:

  • De koppeling “lijkt” op SOAP. De interface kan geen WSDL produceren dus je kunt geen stubs laten genereren op basis van een WSDL (die dus niet bestaat).
  • Aenova heeft zelf een document getiteld “TimEnterprise SOAP & SCV” die je kan helpen bij de eerste kleine stapjes. Voor de rest moet je echt een consultant van hun inhuren.
  • Als er al error-logging is dan vindt je die in de beheersconsole niet onder SOAP-log, maar onder ‘server-log’.
  • Er is op de SOAP-interface zelf geen foutmeldingen te krijgen. Je krijgt bij een import-actie een record-id terug. Een leeg record-id betekent dat er een foutmelding in de server-log staat. Waar die staat is dan weer vers twee. Omdat volgens de XML standaard er geen relatie is tussen de volgorde waarin je records verstuurt, versus de geretourneerde resultaten, heb je hier dus feitelijk niks aan. Tenzij je natuurlijk zelf ook een interface in elkaar flanst.
  • Het is erg raadzaam om de normale Java client beschikbaar te hebben (komen we later op) en dat je de rechten hebt om export-definities te maken.

Van start

Nu je dit weet kunnen we van start. Mijn eerste stapjes betekende een script maken dat vanaf Linux (in dit geval een absolute aanrader om te gebruiken) vragen te kunnen stellen aan de Tim server.

Op de Tim server dien je de SOAP interface “aan” te zetten. Je moet daarbij een userid en wachtwoord instellen die je later nodig hebt.

Mijn script zag er als volgt uit:

#!/bin/bash
wget --debug --http-user=timnsoap --http-password=aenova --post-file=$1 -O - http://servernaam:10980/impexp/ | xmllint --format - | less

Voor de duidelijkheid: het script bestaat uit 2 regels. Dus van “wget” tot “less” is 1 regel!

Als je het aanroept vertel je op de commandline welk xml bestand je wilt verzenden, op basis waarvan Tim je vervolgens een antwoord zal geven.

Voorbeeld 1

Een voorbeeld van zo’n XML bestand is het volgende voorbeeld.

Stel dat je een overzicht wil van de mensen die een aanvraag voor een bepaald type verlof hebben ingediend. Als je met behulp van bovenstaand scriptje het volgende bestand naar de Tim server stuurt (pas wel even het email-adres aan dat er in staat), krijg je het antwoord daarop retour (als alles goed gaat).

<?xml version="1.0" encoding="UTF-8"?>
<soapenv:Envelope xmlns:soapenv="http://schemas.xmlsoap.org/soap/envelope/"
xmlns:xsd="http://www.w3.org/2001/XMLSchema"
xmlns:xsi="http://www.w3.org/2001/XMLSchema-instance">
<soapenv:Body>
<export soapenv:encodingStyle="http://schemas.xmlsoap.org/soap/encoding/" xmlns="impexp.timn.aenova.nl">
<data>
<Aanvraag>
<filter><Persoon><EmailAdres>username@domain.tld</EmailAdres></Persoon></filter>
<Persoon><EmailAdres></EmailAdres></Persoon>
<Periode><Start/><Eind/></Periode>
<Roostercategorie><Naam/><Aanwezigheid/><Status/></Roostercategorie>
</Aanvraag>
</data>
</export>
</soapenv:Body>
</soapenv:Envelope>

Tot zover de export van gegevens. Je kunt ook zaken importeren, maar realiseer je dus wel dat de feedback die je krijgt minimaal is. Geen error-strings retour voor ons sterfelijke zielen :-).

Voorbeeld 2

In het volgende voorbeeld krijgen we uit een andere applicatie een bepaald tijdsbeslag wat we vervolgens bij Tim willen invoeren. Dus wie heeft wanneer wat en hoe lang gedaan?

In XML ziet dat er dan als volgt uit:

<?xml version="1.0" encoding="UTF-8"?>
<soapenv:Envelope xmlns:soapenv="http://schemas.xmlsoap.org/soap/envelope/"
xmlns:xsd="http://www.w3.org/2001/XMLSchema"
xmlns:xsi="http://www.w3.org/2001/XMLSchema-instance">
<soapenv:Body>
<import soapenv:encodingStyle="http://schemas.xmlsoap.org/soap/encoding/" xmlns="impexp.timn.aenova.nl">
<data>
<Tijdregistratie>
<Persoon><EmailAdres>gebruiker@domein.nl</EmailAdres></Persoon>
<Product><Code>6200</Code></Product>
<Datum>31-10-2012</Datum>
<Duur>7:30</Duur>
</Tijdregistratie>
</data>
</import>
</soapenv:Body>
</soapenv:Envelope>

Waar vind je de veldnamen?

Maar hoe kom je er nu achter welke velden er allemaal bestaan?

Eigenlijk is dat nog best eenvoudig (als je het weet). Je gaat namelijk naar de normale  Tim Java-applicatie, en kiest dan Bestand->Import/Export->Import/Export definities (let op de gebruikersrechten!).

In dit scherm is het mogelijk een nieuwe definitie te definiëren. Men kiest een tabel en vervolgens het veld of eventueel het subveld. Als de set met gewenste gegevens naar wens is kan men een export van de gegevens maken. De eerste regel van deze export bevat vervolgens een overzicht van de diverse velden die in de gegevensset staan. Deze kan dan weer als basis dienen voor een SOAP im- of export.

Unieke keys

Als je een bestand steeds opnieuw inleest, bijvoorbeeld met een combinatie van gebruikersnaam, datum, productcode en aantal uur, dan zullen er steeds records worden toegevoegd. Om aan te geven dat een bepaalde combinatie van velden leidt tot een unieke key voorzie je het betreffende veld van de tag “@”, dus bijvoorbeeld <product “@”>.

Afsluitend

Met de kennis die we nu hebben kunnen we zelf aan de slag om uit Tim te halen wat iemands beschikbaarheid is zodat we daar in het project planningspakket rekening mee kunnen houden. Omgekeerd kunnen we de in ons bug-management systeem ingevoerde uren automatisch importeren in Tim zodat iemand slechts éénmalig zijn uren hoeft te registeren.

Categorieën
LibrePlan

We are almost done!

Miciele has been very bussy with our LibrePlan-Jira connector and we are currently finalizing  our work into a patch. My guess is that we will send in our patch today or tomorrow. So it’s time to show you all the latest developments.

In project window General data: “Sync with jira” button disabled. This can happen if “Jira  activated” is unchecked in jira-connector configuration.

In project window General data: where to sart sync with jira (“Sync with jira” button enabled).


When you first start your sync, an auto-complete list box to select the Jira label you want to sync with will appear:


After sync: the synchronized label is displayed. If you now click the “Sync with Jira” button no pop up screen(to select label) will be shown, instead sync will start for the displayed (already synchronized) label.


If there is something to report, a Synchronization info dialog will appear. It  shows the failure or success info of the sync operation. This can be info like (no Jira worklog found for  a specific issue, or an error if a resource is missing from the LibrePlan configuration. We decided some time ago not to auto-create resources because there is not enough info available to do that automagically.


The WBS(tasks) window: The “hours” colum is disabled (because they come from Jira) and the “code” column contains clickable(!) links to the Jira issues.


And now the really fun part starts! This next 2 screens are so cool (imho).

The Project planning window, zoomed on “Week”.  What you see is the sum of the worklogs. But you also see a progress estimation, based on the Jira estimated time per issue and the worklogs available. So it looks like we are a little ahead of our initial planning. This makes a projectmanager always happy 🙂


If we open the project and look at the individual task progress we see the following screen, scheduling zoomed on a “day” level. As you can see the task in the middel needs some attention because the worklogs have past our initial planning and the progress is only halfway there. This issue needs a project manager’s attention quick!


We have decided to make a timesheet based on a jira-connector timesheet template. The next picture shows the list of available timesheets.


This one shows the timesheet details. The only difference with a ‘default’ timesheet is the extra ‘summary’ column. It shows the comment field of a Jira worklog entry.


The last picture shows a timesheet lines list.

So this is it. We are building the patch right now and hope you all like what we have build.

Kind regards,

Jeroen Baten


Categorieën
LibrePlan

New progress report Jira-LibrePlan connector (with timesheets!)

Hi,

It’s been some time since my last update. Miciele is still working hard to get our Jira-LibrePlan connector working.

In this post I will show some new screenshots and tell you where we are heading.

Sofar we can import Jira issues into LibrePlan as separate WBS items. (see earlier post). After setting up a sync you can not change the label in LibrePlan to prevent people from really screwing up the WBS contents:

After a sync the WBS is filled with the summaries of Jira issues:

Now we can import the worklogs from jira to generate a monthly timesheet based on the work done on these issues.

So the timesheet list looks like this:

Now, from this list, we can select a sepatate montly timesheet from someone. That one looks like this:

Thing is, when LibrePlan imports worklogs from users that are known in Jira but not yet known in LibrePlan. Off course auto-create would be nice. But it has some drawbacks. After some thinking we decided to start this release with giving an error message:

So now you know which users/resources you have to add to LibrePlan.

Are we done yet?

Actually, no. We need to cleanup stuff, document it and write some unit-tests. We plan to send our first attempt for a patch somewhere in the next week (october 1st-7th 2012).

After a succesfull merge we will continue with trying to get it connected to a product called Timn Enterprise from a Dutch company called Aenova.